Tuesday, 15 May 2012
About the ad approval process
All AdWords ads go through an approval process to make sure that they're safe and appropriate for users. We review each ad to see if it complies with our advertising policies. If we find any issues, we'll notify you with information about the policy and what you can do to get your ad approved.
How to submit ads for approval
Whenever you create a new ad or make changes to an existing ad, your ad automatically gets submitted to us for review.
How long it takes
We strive to review all ads as quickly as possible, usually within three working days. If you've been waiting for your ads to be reviewed for more than three working days, please contact us.
What we review
When reviewing your ads, we look at several elements of your campaign, including your campaign settings, keywords and websites. We look at both the formatting (what your ad looks like), as well as the content (what you're advertising).
If we find anything that doesn't follow our policies, we'll mark your ad or keyword and send you an email with information about that policy. You'll also get an alert in your account pages informing you about the disapproval. For example, if we find an ad that points to a website that's not working, we'll mark that ad as "Disapproved" and send you an email explaining why we disapproved the ad.
Approval statuses
During the approval process, your ads will be given one of the following approval statuses:
* Under review
* Eligible
* Approved
* Approved (non-family)
* Approved (adult)
* Approved (limited)
* Disapproved
* Site suspended
For more details about each of these statuses, please see our article on approval statuses.
Next steps
* Review our advertising policies.
* Learn how to fix a disapproved ad.
* Learn how to fix a suspended site.

How can I experiment with different ad texts without affecting my ad ranking?
You can try out variations of your ad text to help maximise your return on investment, and you can do it without losing your current ad's performance history. Since editing an ad will erase its previous performance history on Google, we recommend following the tips below to avoid affecting the matched keyword's Quality Score and ad position before you know what works well and what doesn't.
1. Create multiple ad texts whenever possible.
If you're curious about how something like an exclamation mark might affect your ad, create a second one with the new punctuation rather than edit the initial ad. The two ads will take turns showing for search queries, so you can gather data on the new ad while still showing your original ad for a portion of the time. When creating new ads, remember that all the Display and Destination URLs within a single ad group must have the same domain.
If you find that the unedited ad performs better, you can simply delete the new ad. Or, if you find that the new ad performs better, it will have had time to accrue performance history and a higher position by the time you delete the first ad.
Learn more about having multiple ads in the same ad group.
2. Make edits when necessary.
There may be instances in which you need to edit your ad (e.g. you may need to change a price or date). Go ahead! You may see some fluctuation in Quality Score, but this shouldn't last long. If the ad isn't significantly different, it's likely to perform similarly to how it did before, meaning that its position will ultimately stay the same.
Use account statistics, reports and Google Analytics to see which ads bring you the best results.
How do I make my ad text bold?
Part of your ad text will appear in bold whenever it matches or nearly matches a user's search query. Here are a few examples to demonstrate how this feature works:
I. Search query exactly matches your ad text
* search query: rental car
your ad title: Rental Car Bargains
how your ad appears: Rental Car Bargains
The search query is identical to a phrase in your ad, so that phrase appears in bold.
II. Search query nearly matches your ad text
* search query: rental cars
your ad title: Rental Car Bargains
how your ad appears: Rental Car Bargains
Most plural and singular variations of a search query will appear in bold.
* search query: used fridge
your display URL: www.website.com/usedrefrigerator
how your ad appears: www.website.co.uk/usedrefrigerator
Some common abbreviations and misspellings of a search query will appear in bold. This is also true for extremely relevant synonyms.
III. Search query does not match your ad text
* search query: chess
first line of your ad: Buy Checkers Games
how your ad appears: Buy Checkers Games
'Checkers' and 'chess' are not similar enough for your ad text to appear in bold.
* search query: buy chess games
first line of your ad: Buy Checkers Games
how your ad appears: Buy Checkers Games
Even though 'checkers' and 'chess' are not sufficiently similar, 'buy' and 'games' match terms in the search query and will appear in bold.
A few last things to note:
* Taking advantage of the ad bolding feature is the only way for your ad text to appear in bold. You cannot manually create bold, italicised, underlined or any other kind of formatted ad text.
* All parts of your ad have the potential to appear in bold, including the title, body and display URL.
* The ad bolding feature applies to Google search result pages and some sites and products in the Google Network.
For more ideas on how to create an effective ad, see these ad tips.
Using Google Website Optimiser to build better landing pages
Once you’ve attracted people to your website with a great AdWords ad, you probably want to make sure that they can easily find the information or product that they’re looking for. Google Website Optimiser can help you test how well various pages work in getting your visitors to accomplish a specific goal – such as purchase a product. In turn, this can help you increase your revenue and make the most of every visitor who comes to your website.
What is Google Website Optimiser?
Google Website Optimiser allows you to test variations of the pages on your website to see how this changes the behaviour of your site’s visitors – allowing you to improve your pages to increase conversions, newsletter sign-ups or whatever your online goals.
What you can do with Google Website Optimiser
With Google Website Optimiser, you can:
* Compare how different web pages perform using a random sample of your visitors.
* Choose what type of goal you’d like to test.
* Specify how much of your site’s traffic should be involved in your experiment.
An example of using experiments to improve your business
Let’s say that you have a website where you sell house cleaning services. You offer basic cleaning, deep cleaning or detailed cleaning. With your AdWords account, you advertise your detailed cleaning because it's where you make your most money. To increase your return on investment and your business’ profits, you’re interested in getting more people to purchase this option.
At the moment, people who click on your AdWords ad for detailed cleaning arrive on a dedicated landing page that explains your three cleaning options. Because this is your ad’s Destination URL, this is the first page that you want to use for testing. For your Google Website Optimiser experiment, you create several new versions of this web page – one with big red lettering selling the detailed cleaning, one where you expand on the benefits of the detailed cleaning and one where you put an icon next to the link to purchase a detailed cleaning.
After you’ve set up and launched your experiment, a random sample of your website visitors who go to that Destination URL will see one of the four different pages, including your original web page. Then it’s only a matter of waiting to see which page gets the highest percentage of people to purchase the detailed cleaning.
When you’ve figured out which page helps you accomplish your business goals the best, you can make this page live so that all your site’s visitors see it.
Next step
* Create a Google Website Optimiser account.
* Read the Website Optimiser getting-started guide.
* Read more about how Website Optimiser and AdWords interact.
Change Language:
* ©2012 Google
* Google Home
* Privacy Policy
* Terms of Service
* AdWords Advertising Policies
* Help with other Google products
* Contact AdWords
Send feedback about the new look
Intro to AdWords
About comments
If you choose to enable comments, visitors to your blog will have the option to respond to your published posts. Blogger supports threaded commenting which means we display comments such that a reader can more easily differentiate between whether someone is making a general comment on the thread, or responding to another comment on the thread. Single-level comments will always be displayed chronologically.
Enabling comments
To enable comments, click on Settings from the drop-down menu on your Dashboard, then go to the area for posts and comments.

 There, you'll see all the settings to manage your comments.
 1. Comment location: Select "Embedded" if you'd like to enable threaded commenting.
2. Who can comment?: Here you can specify who can comment on your posts. The options range from anyone (which means that anonymous users can comment without having to sign in to any type of account first) to only members of the blog (if it's a team blog).
3. Comment moderation: Decide if you'd like to always, sometimes, or never moderate comments. If you select "Always," you'll have the option to enter in an email address where you can receive notifications that there are comments awaiting moderation. If you select "Sometimes," you'll be prompted to specify how many days old the post should be before it requires moderation. "Sometimes" is a good option for bloggers who want to make sure that comments on all posts are kept fresh and recent, and that conversation or debates on old posts aren't suddenly rekindled.
4. Show backlinks: Turning on this option will show all the URLs around the web that link to your blog post. The URLs will be visible to both you and to the readers of your blog.
5. Comment form message: Add a message to your readers who click to comment on your blog. Some bloggers like to include a little thank-you note, or details about how they tend to follow-up with comments.
Enabling comments on a post-by-post basis
If you don't want your comment settings to be blog-wide, you can click on the menu on the right side of the Post Editor to set post-specific comment settings. Here you can choose among three options: Allow; Don't allow, hide existing; Don't allow, show existing.
1. Comment location: Select "Embedded" if you'd like to enable threaded commenting.
2. Who can comment?: Here you can specify who can comment on your posts. The options range from anyone (which means that anonymous users can comment without having to sign in to any type of account first) to only members of the blog (if it's a team blog).
3. Comment moderation: Decide if you'd like to always, sometimes, or never moderate comments. If you select "Always," you'll have the option to enter in an email address where you can receive notifications that there are comments awaiting moderation. If you select "Sometimes," you'll be prompted to specify how many days old the post should be before it requires moderation. "Sometimes" is a good option for bloggers who want to make sure that comments on all posts are kept fresh and recent, and that conversation or debates on old posts aren't suddenly rekindled.
4. Show backlinks: Turning on this option will show all the URLs around the web that link to your blog post. The URLs will be visible to both you and to the readers of your blog.
5. Comment form message: Add a message to your readers who click to comment on your blog. Some bloggers like to include a little thank-you note, or details about how they tend to follow-up with comments.
Enabling comments on a post-by-post basis
If you don't want your comment settings to be blog-wide, you can click on the menu on the right side of the Post Editor to set post-specific comment settings. Here you can choose among three options: Allow; Don't allow, hide existing; Don't allow, show existing.
 Tell us how we're doing - Answer five short questions about your help center experience


Change your site's feed settings
To enable or disable the site feed(s) for your blog, first go to the Settings | Other tab.
Here, you can select how much of your content you want to syndicate. "Full" will put the entire content of each post in your site feed, while "Short" only includes an excerpt from the beginning of each post. Select "Until Jump Break" to show all post content before your jump break. The "None" option turns your site feed off entirely. For more advanced options, you can select "Custom."
 When you select "Custom," you'll see options for three different types of feeds. Each option has the same "Full," "Short," and "None" setting choices.
* Blog posts: This is the same as the original, "Allow Blog Feed" option.
* Comment feed: This will contain all comments made on all posts on your blog.
* Per-post comment feed: With this option, each individual post will have its own site feed, containing only its own comments.
Notes:
* Once you've enabled your site feeds, you may want to provide a way for your readers to find them. If the template you're using isn't displaying links to these files, you can add them in using the site feed template tags.
* All site feeds are published in Atom 1.0 format. However, if you add ?alt=rss to the end of any site feed URL, you can get the same feed in RSS 2.0 format.
* Feedburner has its own 'summary' setting which, if enabled, may affect the display of your feed for the Until Jump Break option. You can correct this by logging into Feedburner and disabling the Summary Burner option from the Optimize tab.
When you select "Custom," you'll see options for three different types of feeds. Each option has the same "Full," "Short," and "None" setting choices.
* Blog posts: This is the same as the original, "Allow Blog Feed" option.
* Comment feed: This will contain all comments made on all posts on your blog.
* Per-post comment feed: With this option, each individual post will have its own site feed, containing only its own comments.
Notes:
* Once you've enabled your site feeds, you may want to provide a way for your readers to find them. If the template you're using isn't displaying links to these files, you can add them in using the site feed template tags.
* All site feeds are published in Atom 1.0 format. However, if you add ?alt=rss to the end of any site feed URL, you can get the same feed in RSS 2.0 format.
* Feedburner has its own 'summary' setting which, if enabled, may affect the display of your feed for the Until Jump Break option. You can correct this by logging into Feedburner and disabling the Summary Burner option from the Optimize tab.

Enable Affiliate ads in your blog posts
Overview
You can incorporate product ads within your blog post by using Google Affiliate Ads for Blogger. When readers click on an ad (whether it’s via a text or image link), they’re led to a site to purchase that product. If your ads generate sales or conversions for participating advertisers, you may earn commissions and receive payment through your AdSense account.
How it works
Once you’ve accepted the Google Affiliate Ads for Blogger Terms and Conditions, you’ll see the Advertise Products gadget on the right-hand side underneath Gadgets in the Post Editor.
 Let’s say you’re writing about your weekend discovering trails around your neighborhood, and you want to recommend the running shoes you wore. Simply type in the product, retailer, or brand name into the widget, and scroll down the list of products to find the one you like.
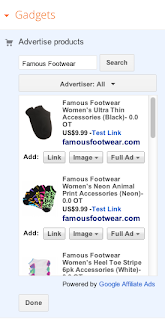 Underneath each product, you’ll have the option to insert the ad as a link, image, or full ad.
 A link will simply hyperlink selected text in your blog post, while an image will look like this:
 and a full ad will look like this, including more information about the product:
 You can adjust the size and position the images or ads just like you would a photo within your blog post.
A few tips for promoting products in your blog:
* Choose products or brands that are appropriate to the content of your blog and to your audience.
* Be honest with your readers.
* Be as passionate about the product you’re recommending as you are about your blog.
* Embed the Google Affiliate Ad right in your post to make it easy for users to check out your recommendation.
Get started
To start using Google Affiliate Ads for Blogger, you need an AdSense account. However, this doesn’t mean that you have to display AdSense ads on your blog. With AdSense and Google Affiliate Ads for Blogger enabled on your blog, you can choose whether you want to display one, the other, or both.
Blogs using Google Affiliate Ads for Blogger are matched with advertisers based on the content that appears on their blogs, so individual advertisers may not be available to all blogger users. If you would like to work with Google Affiliate Network advertisers that aren’t available through Google Affiliate Ads for Blogger, you can sign up as a direct Google Affiliate Network publisher and apply to specific advertiser programs.
I already have an AdSense account
Just go to your Post Editor to write a new post. If your blog has been matched with an advertiser, you should see the Advertise products under the Post Settings section on the right-hand side of the Post Editor.
I don’t have an AdSense account
All transactions with Google Affiliate Ads for Blogger are handled through AdSense -- even if you choose not to display any AdSense ads on your blog. To sign up for AdSense, just click on the Earnings tab on your blog and then Get started. We’ll ask to you fill out a form to provide some information about yourself, and then send you an email once your account has been approved.
Once you’re approved for AdSense, you should see the settings for Google Affiliate Ads in the Post Settings section on the right-hand side when you’re in the Post Editor writing a new post.
I followed the directions, but I don’t see the Google Affiliate Ads option
This feature is currently limited to U.S. users whose Blogger language is set to English.
If you’re a U.S. user and don’t see this option, it just means that you haven’t yet been approved to use Google Affiliate Ads (even if you’re an approved AdSense user). As we’re still slowly adding more and more advertisers to our program, not all blogs will immediately be approved to display Google Affiliate Ads.
There’s no need to take any action if you’re not immediately approved for Google Affiliate Ads with Blogger, as the option under Post Settings will automatically appear once we’ve partnered with advertisers appropriate for your blog.
Viewing your earnings
To view the income you’ve earned from AdSense or from Google Affiliate Ads for Blogger, just click on the Earnings tab on your blog.
You can adjust the size and position the images or ads just like you would a photo within your blog post.
A few tips for promoting products in your blog:
* Choose products or brands that are appropriate to the content of your blog and to your audience.
* Be honest with your readers.
* Be as passionate about the product you’re recommending as you are about your blog.
* Embed the Google Affiliate Ad right in your post to make it easy for users to check out your recommendation.
Get started
To start using Google Affiliate Ads for Blogger, you need an AdSense account. However, this doesn’t mean that you have to display AdSense ads on your blog. With AdSense and Google Affiliate Ads for Blogger enabled on your blog, you can choose whether you want to display one, the other, or both.
Blogs using Google Affiliate Ads for Blogger are matched with advertisers based on the content that appears on their blogs, so individual advertisers may not be available to all blogger users. If you would like to work with Google Affiliate Network advertisers that aren’t available through Google Affiliate Ads for Blogger, you can sign up as a direct Google Affiliate Network publisher and apply to specific advertiser programs.
I already have an AdSense account
Just go to your Post Editor to write a new post. If your blog has been matched with an advertiser, you should see the Advertise products under the Post Settings section on the right-hand side of the Post Editor.
I don’t have an AdSense account
All transactions with Google Affiliate Ads for Blogger are handled through AdSense -- even if you choose not to display any AdSense ads on your blog. To sign up for AdSense, just click on the Earnings tab on your blog and then Get started. We’ll ask to you fill out a form to provide some information about yourself, and then send you an email once your account has been approved.
Once you’re approved for AdSense, you should see the settings for Google Affiliate Ads in the Post Settings section on the right-hand side when you’re in the Post Editor writing a new post.
I followed the directions, but I don’t see the Google Affiliate Ads option
This feature is currently limited to U.S. users whose Blogger language is set to English.
If you’re a U.S. user and don’t see this option, it just means that you haven’t yet been approved to use Google Affiliate Ads (even if you’re an approved AdSense user). As we’re still slowly adding more and more advertisers to our program, not all blogs will immediately be approved to display Google Affiliate Ads.
There’s no need to take any action if you’re not immediately approved for Google Affiliate Ads with Blogger, as the option under Post Settings will automatically appear once we’ve partnered with advertisers appropriate for your blog.
Viewing your earnings
To view the income you’ve earned from AdSense or from Google Affiliate Ads for Blogger, just click on the Earnings tab on your blog.
 To view details about your earnings, click View dashboard under Google Affiliate Ads. You’ll be led to a Google Affiliate Network page with information about the income you’ve generated.
Other information
Google Affiliate Network reminds you to please comply with laws that may require your disclosure of any financial benefits you receive for endorsing specific products or services. To learn more about Google Affiliate Ads for Blogger, read our Frequently Asked Questions.
To view details about your earnings, click View dashboard under Google Affiliate Ads. You’ll be led to a Google Affiliate Network page with information about the income you’ve generated.
Other information
Google Affiliate Network reminds you to please comply with laws that may require your disclosure of any financial benefits you receive for endorsing specific products or services. To learn more about Google Affiliate Ads for Blogger, read our Frequently Asked Questions.


Subscribe to:
Posts (Atom)